SmartCall Messenger Support Center

Author: admin

SmartCall Messenger as a Shortcut

JTECH recommends that you create a short cut on your desktop so you always have a link to the SmartCall Messenger site.

Go to your Desktop, right click NEW > Shortcut

Enter in the location name: www.hmeapps.com/smartcall25

Click NEXT

We recommend naming the shortcut “SMARTCALL MESSENGER”

Select Finish

Once this is complete you will have an icon on your desktop that will be named “SMARTCALL MESSENGER”.

Every time you click on this icon it will bring you directly to the SmartCall Messenger log in page.


If you have any questions or need any assistance please contact the JTECH customer support team via email or phone @ 800-925-8091

Continue Reading

Web Browser Compatibility

Compatibility

The following browsers have all been tested with SmartCall SMS and have been considered satisfactory alternatives to Google Chrome for desktop users.

> Google Chrome
> Firefox – version 31.0 or higher
> Internet Explorer – version 10 or higher
> Opera – version 10 or higher

Windows Surface and Chromebook are the recommended tablets.

As of date of publication, Apple iPad, Amazon Kindle Fire and Android powered tablets; like Samsung and Acer models, have only limited functionality and are not recommended nor supported by JTECH.

Mixed Content
The SmartCall domain is encrypted with 128-bit encryption to ensure a safe browsing experience. When sending paging messages to our on-site, networked transmitters, SmartCall SMS utilize a mix of HTTPS and HTTP content. All paging is handled behind the site’s firewall and transmitters do not require internet access.

HTTPS / HTTP*
Paging messages may be sent in HTTP or HTTPS format. The paging URL contains the transmitters internal IP address, pager, message, and alert type information therefore no personal information is at risk.

To enable the mixed content on your computer, please use the following guidelines:

Users may need to adjust browser settings to allow “mixed content” and ensure successful transmission of the paging messages.

For Internet Explorer, choose Tools (Alt + x): Select Internet Options > Security > Trusted Sites > Sites > Add https://*.hmeapps.com  > Close. While still under Trusted Sites – Click Custom Level > Miscellaneous > Select Enable under Display Mixed Content.

For Chrome, there is not a setting like those above. To allow mixed content perform the following:

Make sure all open Chrome browsers are closed. On the desktop, right click the Google Chrome icon and Select “Properties”; in the box named Target, add 1 space to the end of the command after chrome.exe(“) then type:

–allow-running-insecure-content
(note: there are two dashes ( – ) in front of allow) When completed, click OK.

More information on Chrome and mixed content can be found at: https://support.google.com/chrome/answer/1342714 ?hl=en

Note: Some locations may need to consult with their IT department to update the mixed content settings.

*ISTATION transmitters require firmware version 2.21 or higher.


Continue Reading

Transmitter Configuration

Integrating with Pagers

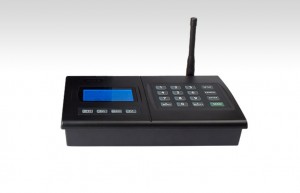
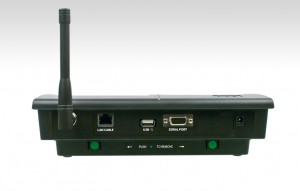
To utilize pagers, you will require an Integration Station transmitter (part # ISTATION, image below) plugged into your network router or directly in a wall connection to deliver messages. ISTATION firmware must be version 2.21 or higher or you will not be able to page.
Please contact your sales representative for upgrade details, if needed.

gallery-guestcall-iq-7 gallery-tablescout-4

Your Integration Station transmitter requires a dedicated IP address within your network. To configure the transmitter you will require the information below, an Ethernet cable, and a free port on your network and router.
Please contact your IT Administrator to obtain the address information prior to proceeding. If provided prior to shipping, we will configure the transmitter in advance.

To configure the transmitter:

  1. Press SETUP, enter the password 6629 and press ENTER, you should see TCPIP SETUP.
  2. Press * MENU 1x. The display will say IP ADDRESS; press ENTER to edit this field.
  3. Enter the 12 digit IP address IT has provided, when entered press ENTER to accept.
  4. Press MENU 1x. The display will say SUBNET MASK; press ENTER to edit this field.
  5. Press MENU 1x. The display will say GATEWAY IP.; press ENTER to edit this field.
  6. Enter the 12 digit IP address IT has provided, when entered press ENTER to accept.
  7. Enter the 12 digit IP address IT has provided, when entered press ENTER to accept.
  8. Press CANCEL to exit the menus.
  9. Connect transmitter to your network router by plugging an Ethernet cable in the available port, then into the transmitter jack labeled LAN CABLE – On the back of the transmitter the light on the transmitter jack should illuminate green when the connection is live.

NOTE: The transmitter will display a small ‘T’ in the upper right hand corner when messages are received from the software and broadcast.

PDF Version: SMS Transmitter Configuration

Continue Reading
Continue Reading

Administration Overview

Step-by-step instructional video walks you through navigating the Administration portion of the SmartCall Messenger system.

Note: Click the settings icon and select Autoplay.

Click here for additional support documentation.

Continue Reading

Paging Overview

Step-by-step instructional video walks you through navigating the Waitlist portion of the SmartCall Messenger system.

Continue Reading

Staff Paging Overview

Step-by-step instructional document walks you through navigating the Staff portion of the SmartCall Messenger system.


Click here for additional support documentation.

Continue Reading

Getting Started

Account Administration & Setup


Administration

At any time, hover over the “Welcome” box in the upper right and choose ADMINISTRATION.
In Administration, you can:
► Edit Company Info
► Add/Edit Pagers and Transmitters
► Add/Edit Departments
► Add/Edit Preset Messages
► Add/Edit Users and Passwords
► View Reports

Account Information
Add a Company Logo or modify Account owner information (admin privileges required).

Pagers – (if applicable)
► Add pager numbers as either Alphanumeric (full text) or Vibe/Numeric (no display) pagers.
► Add “static” IP addresses of ISTATION transmitters. Messages are sent via internal network to one or multiple transmitters. Multiple addresses should be added in separated by commas.

Departments
Each list for waiting or staff is considered a “Department.”
► Input Department Name and select icon if desired.
► Assign Minimum and Maximum thresholds.
► Thresholds determine when the record changes color on the waitlist.
► Click + to add. Once all Departments are added, their position can be adjusted by clicking on Edit.

Import
Administrators can import a .CSV or .XLS file that includes the day’s records. All imported records will show up as NOT ARRIVED on the Waitlist. Samples are available for download to ensure proper mapping.

Messages
There are two different types of Pre-Set Messages available;

1) The Welcome Message and 2) The Pre-Set messages for the Waitlist and Staff.

The Welcome Message is sent whenever a mobile phone is added to a Waitlist. Edit the field inside the phone to craft your specific message – 60 character limit.

Leaving it blank or toggling the green switch will turn off the Welcome Message feature.

Pre-Set Messages are messages that users can choose from to page on the Waitlist or Staff screens.

To setup, select a Department from the list on top; add message(s) by Department and by List type. Waitlist are in the top table, Staff messages are in the lower table.
► Edit messages at any time by highlighting the message and making the necessary changes.
► Messages cannot contain special characters (e.g. *@%?<>;). Periods and commas are permitted

Users
Users are defined as the login credentials anyone will utilize when accessing the system. Users are not all staff members who may be paged, that is handled on the Staff list outside of Admin.
► Login names can be specific to a person or generic for multiple users like Greeter or Nurse.
► Add Users by completing each of the boxes at the bottom of the screen, passwords are case sensitive.
► For each username, highlight the name and assign the departments they will have access to.

Reports
Multiple reports are available for research or a deeper look at the daily operation.

Exit Admin – Set up is complete

PDF Version: SmartCall Messenger Quick Setup


Continue Reading